Basic African Violet Care for Beginners
Many excellent books have been written over the years about African violets, and I do hope you will take the time to find and read them if you really want to grow these plants well. The internet offers a wealth of knowledge at your fingertips, but do be careful. Try to find reputable sites, and always approach wild-sounding ideas with healthy skepticism before drastically changing something in your culture or environment.
On this page, you will find some of my basic growing information. Keep in mind that there are numerous ways to grow African violets successfully. It can be confusing out there with so many differing opinions. But if you try to just focus on the basics of what the plants like and don’t like, you will learn fairly quickly what will or won’t work in your environment.
Below, download my Top 10 Tips!
| amys_top_10_tips.pdf |
In Nature . . .
African violets are indeed tropical plants, living in moist, porous soils in mountainous regions with strong, filtered sunlight. This "soil" they grow in is not the garden dirt we are accustomed to, nor is it the thick heavy potting soil most commonly sold in stores. Instead, it is usually a small pocket of rich, composted plant material and tiny stones. The compost offers nutrients and a very light consistency, while the stones allow adequate air movement and drainage. Both of these conditions allow the fine, hairy roots to breathe, penetrate and multiply. And this, of course, leads to large healthy plants with plenty of flowers.
So, what does this mean for us? How can we translate these requirements and modify them enough to find success in an unnatural environment?
So, what does this mean for us? How can we translate these requirements and modify them enough to find success in an unnatural environment?
Potting Medium and Pots
First of all, you should never put your violet in a large pot. In this case, a small, squat pot is better. A general rule of thumb is that the diameter of the pot should be approximately 1/3 the diameter of your plant's healthiest, outermost leaves. A smaller pot will also have another advantage. By restricting roots, our plants will bloom better and quicker than if they had unlimited depth. Plastic pots are best, since clay pots tend to dry out too fast as well as become slimy or discolored over time. Be sure your pot has a drainage hole in the bottom!
For the "soil", try to avoid using anything with real dirt, at least at first. You actually want a soil-less mix - something that is very light, fluffy and balanced. A very basic and easy medium to start with includes one part each of sphagnum peat moss, perlite and vermiculite. If you can't easily find these sold separately, you can try a prepackaged African violet soil and then mix in about 50% additional perlite. Moisten (do not soak) what you plan to use right away with hot water, stir well and let it air out and dry up a little overnight. Then just before use, give it a nice fluffing with a fork.
Our homemade mixes like the one outlined above are generally poor in long-lasting nutritional qualities. Peat moss has some nutrients available, but not quite enough to sustain a plant for very long. This is why fertilizing and repotting your African violets is so important.
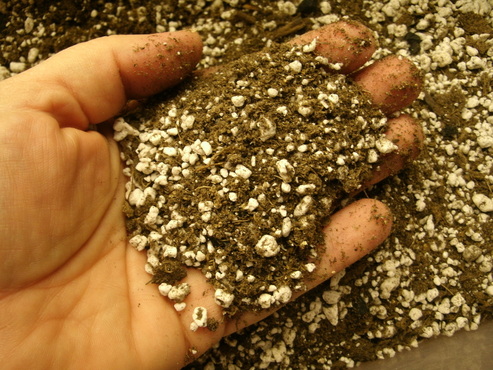
African violet potting mix should be light, fluffy and loaded with perlite for thin roots to grow well.
Fertilizers
Most fertilizers will work on African violets, but there are several confusing choices out there. You don't necessarily need a fertilizer that is manufactured strictly for African violets. On fertilizer packages, you will see the formula numbers listed, like (7-7-7) or (12-36-14).
What do the numbers mean? Nitrogen - Phosphorus - Potassium
The first number is the percentage of nitrogen present in the fertilizer. In the simplest of terms, nitrogen is mostly responsible for healthy, vigorous green leaves.
Phosphorus allows the plant to produce roots and blooms. Higher middle numbers are often used when a grower wants to induce flowering or boost bloom count. Phosphorus in smaller amounts can also be helpful in root development in younger plants.
Potassium kind of brings everything together nicely so that other nutrients can do their jobs. It helps boost a plant’s disease resistance and general health.
For the beginner, I recommend using a product that has mostly an even ratio, but over time you may want to experiment with other kinds as well, to see what effect they may have on your plants.
In terms of dilution rates, regardless of what the package tells you, be stingy with it. I rarely use more than ¼ teaspoon of most fertilizers to a gallon of water. Too much fertilizer is definitely worse than not enough! Too much can create an orange crust to build up in your plant’s growing crown. Worse yet, it can burn the delicate roots over time and cause your plant to rot from the soil up.
African violets do like to be fertilized in low doses regularly, year round, but with an occasional break and leaching to flush built up salts from the soil medium. This is a very important step to consider monthly.
Watering
This is typically the #1 killer of African violets, so keep reading if you are an experienced murderer. Here are a few basic rules to follow:
1. Avoid getting water in the crown (growing center) of your plant. Regardless what you’ve read or heard, getting water on the leaves of your plant won’t kill it! BUT... water sitting in the crown and roots being drowned will lead to rot and eventual death.
2. Use room temperature or slightly warm water.
3. Only water your plants when the top of the soil is beginning to dry out, but don't wait so long that the plant begins to wilt.
4. Do not give your plant too much water! It is better to give only small amounts of water at a time and water more frequently than it is to flood your plants to get them through a longer period.
5. Avoid any water that is softened, since the salts are harmful to roots.
Surprise! There are actually many different ways to water your violets, and it can be confusing to pick the right method. But if you’re just beginning, I recommend using the old stand-by method of just top-watering with a can or small bottle. In this way you can best control how much water the plant is getting.
Another easy way of watering, although a little more risky, is to bottom water using a saucer, allowing the plant to soak up with water it needs from the drainage hole. If trying this method, use only a small amount of water at a time and never let the plant sit in water for more than 10 minutes or so. When bottom watering, leaching the soil regularly will be even more important.
There are also less “manual” ways of watering your violets, such as mat watering or wick watering. These methods allow for a constant watering method, whereas the plant draws up only what it needs through a bottom mat or a string-type wick that goes up into the soil medium. These methods require water-holding reservoirs of some kind, separate from the potted plant.
Lighting
In the wild, African violets receive ample dappled and filtered sunlight, and this is what they require to make blooms. In the home, this translates into bright, but indirect lighting. They can be grown beautifully in windows if the light is adequate, not too intense, and the pot is rotated frequently (daily) to maintain a symmetrical plant shape. There are special considerations when window growing, such as temperature variations/extremes, the possibility of sunburning foliage or seasonal lighting differences.
If you want to try window growing, choose bright windows of any directional exposure, set the plant back from the window depending on the intensity of light. Avoid direct sunlight rays, as these can burn foliage. Sometimes a sheer curtain can negate light that is too intense.
Many veteran and show growers use artificial lighting so that they can not only grow larger numbers of plants anywhere in their home, but they can also control the day length and strength of lighting the plants receive. There are 2 basic options for artificial light that works best with African violets: Fluorescent tubes or LED strip lights.
Growers are still experimenting with LED lighting, and so far the results are very promising! I have experimented with certain LED fixtures, and the main concept is LESS IS MORE. LED is more intense than fluorescent or incandescent, which makes it more cost efficient. With that said, it is advisable to experiment very conservatively when first trying LED's. You may want to start with fewer day hours and further distance from plants. Since I’m not well-versed in using them full time, I’ll leave the explanations about those to the other experts out there.
Even when using fluorescent tubes, there are multiple choices. The old-fashioned shop lights used the T-12 type bulbs, which are slowly falling out of favor, but I still use and like them. If it ain’t broke, I don’t try to fix it. There are also T-5 and T-8 style fluorescent tubes, but they provide a much brighter, intense light. Therefore, you will have to compensate for that by shortening the day length these lights are on your plants, as well as increasing the distance between the bulbs and the plants.
With T-12 type bulbs, a general rule of thumb is to place your plants about 8-12 inches below the bulbs. Standard sized plants should be further away than the miniatures. Try using a timer that keeps the lights on for about 8-12 hours per day. Some like more, some like less, so after experimenting a little you should be able to tell what your plants need.
How to tell if the lighting is correct? Watch your plants, they will tell you!
When receiving too much light, or light that is too intense, plants will generally bunch up in the center and foliage will grow in darker and sometimes curved downward with shorter stems. If growing in excessive natural light, they may eventually become brittle, pale, and look sunburned.
When lighting is inadequate, the leaf stems will elongate and grow wispy as plants reach upwards and lean toward the light source. They also will not typically bloom.
In ideal lighting, a single-crowned African violet will generally grow into a nice, flat, symmetrical rosette with evenly overlapping leaves. There are many different violet hybrids these days, so there will be wide variation in how any given plant may perform. But typically, a plant that is happy with its light will grow beautiful foliage AND bloom periodically.
For even more information on how to tell what your plants need, download the file below of my award winning article published in AVSA magazine!
| Recognizing and Correcting Light Problems |
Humidity
Humidity CAN be a big factor when growing African violets if it is extremely high or low.
Many of our homes are in the comfortable range as far as humidity is concerned, being around 40-50%, and this is fine for violets, too. They can tolerate some wide variations in humidity, but when they are left to endure extremes either way, you will begin to see trouble.
In truth, low humidity by itself will rarely kill a violet, but there will still be signs that the plants are unhappy. When the humidity routinely goes too low, you might notice things like: the flower buds on the plants will shrivel up and die before opening, leaf edges will brown and sometime die off, plants may grow smaller and less vigorously than they should. Small saucers of water sitting among the plants can help raise the humidity, or you can place the pots on a thick layer of wet stones. Even grouping several plants near each other will help raise humidity. In some cases, you may want to just add a room humidifier, as it will make the space more comfortable for you too!
If African violets are subject to consistently very high humidity, such as 75+%, over time you will likely notice signs of fungal infections such as root and stem rot, botrytis, blight, pythium or mold. These are very tricky to correct and usually not worth it. This level of humidity is usually achieved in a closed environment as opposed to our open homes. If you have any of your plants or leaf cuttings in “bags” or “domes” to aid in humidity, you must always watch the plants closely for effects of too much humidity. Let bags and domes air out when condensation builds on the sides, and allow anything potted to drain well before doming or bagging.
Repotting
Yes, it's important to repot your plants! As I mentioned above, soil-less mixes are low in nutritional qualities. Even with (and frequently because of) fertilization, our mix becomes stale and toxic to our violets over time as salts build up in the medium. The small ones really need repotting and refreshing twice a year if you want them to be their best and bloom pretty consistently. By removing a portion of the root system, lightly scraping the neck of callouses and replacing the used-up soil, our plants are rejuvenated for another round of brilliant blooms.
African violet DO like to be grown in tight quarters, so when you think it is time to repot your violet, you should spend a good amount of time beforehand grooming all of the old leaves off. When that is done, you can judge what size pot you will need. It's recommended to use the one-third rule: the pot diameter should be about 1/3 the diameter of the plant.
Most of my small varieties are repotted into 3 oz. plastic Solo-type cups or 2 1/2" plastic pots. Going any larger is inviting trouble in the form of root rot. Sometimes you won't necessarily need a larger pot, just fresh soil and a root haircut.
When transplanting into new pots, always be sure to mark the pot with the plant's variety name if you know it. This is also a good time to update your inventory and sanitize trays and reservoirs.
Having trouble?
In truth, there are many things, both pest and cultural that can plague and even kill African violets. But most violet deaths are due to poor cultural practices, so a little homework as you go will do you and the plants wonders.
Over-watering is a big killer, and this is because the roots drown, leaving the plant no means of absorbing water or nutrients. These plants slowly wilt, regardless how wet the soil becomes. When this happens to an African violet, the first thing to check is the roots. First, it collapses as if it isn't getting any water, and within just a few days, the whole thing is brown and rotten. So, the thing to remember is this: never water a soft, wilted plant if it has moist soil. (If this is your issue, the plant needs immediate help and probably drastic repotting!)
Pests do tend to love African violets. But for beginners, being paranoid and over-treating plants can cause more damage and losses in the long run. Most importantly, try to buy from reputable sources, inspect all plants if possible before buying, and isolate any new arrivals far from your existing plants for at least 3 months. Within that time period, pest damage should become evident. And even for beginners, you will soon know when something isn't right with your plants. Obvious signs to watch for include: overall collapse of the plant (sometimes seemingly overnight), deformed crowns with gray, furry, brown or twisted leaves (possible mites), white cottony spots near the main stem (foliar mealy bugs,) spilled pollen on flowers (thrips,) or a wilted plant with tiny white particles in the saucer (root mealy bugs.)
Whenever you think you might have some kind of disease or pest, isolate the plants in question immediately and then check the others for any signs of trouble. Use a magnifying glass to inspect roots and look for anything that moves. This is a place to start, but keep in mind that some pests are not seen with the naked eye or even with a magnifying glass. The pests that are most common to African violets include soil (and foliar) mealy bugs, mites, and thrips. Be cautious about using any pesticides on violets, especially if you don't know exactly what pest you may have. Asking for help from an experienced grower or sending samples to the county agriculture extension lab can be very helpful in finding out how to proceed.
Leaching
Leaching is a term for flushing out your soil mixes without repotting the plant. About once a month or so, it's a good idea to leach out your plants so that any excessive build up of fertilizer salts or salts from your water can be flushed through. These salts will build up over time, creating a very alkaline environment for roots. This imbalance can cause pH problems with the plants (poor growth and color, haloing of leaves,) and eventually lead to a nutrient lock-up of the soil where the roots are not able to utilize the food you're feeding it.
Leaching is easy. Simply take the pot to the sink and use a thin stream of warm water to run through the pot until the water is draining out quite clear. (It won't be perfect.) Allow the plant to drain very, very well before putting it back on your shelf or on a wick. I let it drain in over an open bucket for an hour or so, then if it still seems very heavy and wet, I'll sit it on a stack of paper towels for a few hours.
If you tire of leaching, you can always repot the plants, which really is the best thing anyway. :-)
Your Plant Won't Bloom??
African violets will generally not bloom if they are not getting enough light and/or food. Light should be bright but indirect, and the plant should be receiving it at least half of the day. You should consider not only the intensity, but the amount of time the plant is exposed to the light. Also, violets need food in order to bloom, so use a diluted fertilizer about two to three times per month. If you bottom water, leach the soil once a month to remove salt build up. Also, repotting the plant provides more nutrients and can spur the plant to bloom. Another common cause is if the plant is potted in a pot too large for its root system. Violets bloom when their roots are slightly pot-bound, so make sure you are using the proper size pot.
Check out the blue button for a link to my blog post!